Sunday, December 13, 2015

Sunday's Best: Week 9

"But thanks be to God! He gives us the victory through our Lord Jesus Christ."
                                                                                                          1 Corinthians 15:57


"I can do all things through Christ who gives me strength."  This has been my scripture for the last 3 weeks is what it feels like.  Actually its a scripture that I call on and meditate on very often.  When your building a business from nothing but your passion for sewing and the love of God you have no choice.  When your starting over after a divorce and trying to keep it all together for your children.  You have no choice.  and when you think that things couldn't worst but they do.  You have no choice.


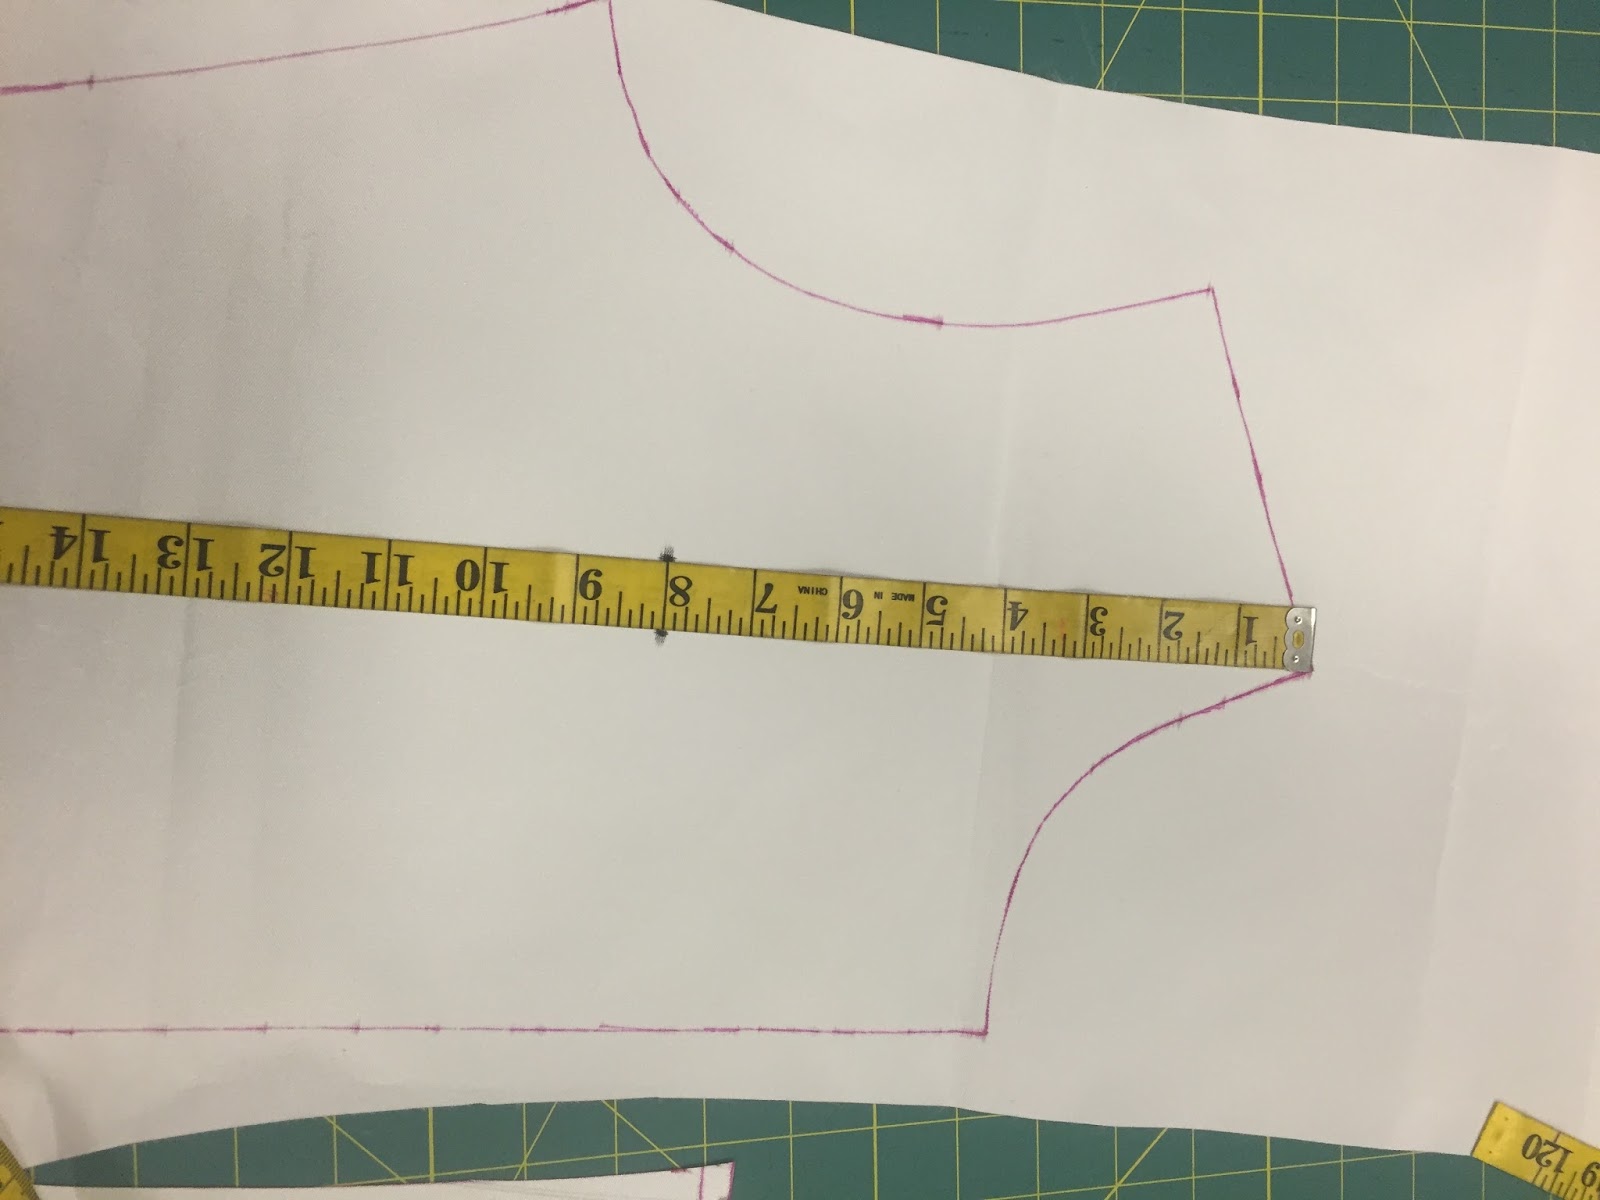
When you decide to sew a maxi skirt and matching midriff top from cheap fabric and it turns into a nightmare project you have no choice.  That is how I felt about this whole project.  I started it last week in the haste of trying to save week 8's disaster project and didn't really think things through.  I also made the mistake of not thoroughly inspecting the fabric before purchasing it. I just looked at the color and price tag of the fabric and was like ".....yup! it'll work." Never again!


The problem with this fabric was the lace.  it stretched and ripped very easily.  To the point that I had to use my serger to sew it together but the hems were impossible to finish without ripping or slipping.  I originally made a matching top with the lace fabric, but I ended up having to toss it because the fabric along the neckline kept stretching and ripping.  I ended up having to buy a different fabric in a matching color to finish it.  I stepped away from this project more than once to problem solve my way through it. There were some other stumbling blocks along the way but there was such a tenacious spirit inside of me to finish it and finish it well.  I couldn't stop.


As soon as a problem arose a solution seemed to appear before I could be completely discouraged.  There were a few times that I wanted to leave it as is and just shoot for better the next project but it seemed like God wasn't satisfied with that decision and sent me a solution and the finance to fix it.

Which leads me to my lesson learned for the week.  I didn't plan this week's project out before I started it.  I also didn't really pray about it either.  I normally pray each week for God to give me vision for all of my personal projects.  I also normally think through the process, what patterns I will use, what technique will work etc.  but this week I didn't do this and it cost me double.  Double time and double the $$$$.  I find that my week goes so much better when I pray and I plan.

Despite it all God's grace still kept me so that I could experience Victory!  In the end I was very happy with my new skirt set.  Thank you Lord! Hallelujah!

Have a blessed week everyone.  May God give you a spirit of prayer and preparation as you enter into this next week!


Tuesday, December 8, 2015

Teach Me Tuesday


How To Read A Sewing Pattern for Proper Sizing


Hello Readers! I hope you are enjoying your Tuesday!

I originally wanted to share a self-drafted pattern tutorial with you but realized that it needed some tweaking before I released it.  For fear of missing my blog deadline for today.  I decided to make things easier on myself while addressing a common mistake that I see in beginner sewists.  That is choosing the right pattern size.  

We as women are accustomed to shopping based on a standard clothing size based on a sizing chart pre-determined by the clothing industry.  We are not accustomed to taking our body measurements let alone choosing our clothing size based on actual body measurements.  The men's clothing industry on the hand is very opposite of this especially in the area of pants, suits and button down suit shirts where they use actual measurements to identify the fit of the garment.

For example: If you ask a man what is his pants size he will say: 34" in the waist and 36" in the length.  He's answering you based on the actual measurement of his waist and the length from his waist to his desired pants leg length. Whereas women will say...." I wear a size 6 and have no idea what her waist measurement is.  Interesting isn't it?

So with that said.... Sewing is the complete opposite of the mass produced ready to wear garment industry.  You have to know your body measurements in order to identify the pattern that is going to get you the most proper fit.  Yay!!! How exciting!!! 

So to make this easier to explain and hopefully for you to understand as well I put together a little video tutorial for you on how to choose the right pattern size.  I hope you enjoy.  Questions or Comments are always welcome!


Sunday, December 6, 2015

Sunday's Best: Week 7

 "I can do all this through him who gives me strength." 
                                                                      Philippians 4:13


Happy Sunday! I am writing this to you all today from a place of renewed strength.  After what seemed like one of the hardest weeks i've endured in a long time. I am thankful that God gave me the strength to get through it, overcome and keep moving forward.

Ironically enough this week's Sunday's Best is a result of the realities of running a sewing blog with a weekly sewing challenge. The opportunity for your sewing project to not come out is real and in all actuality I was prepared for weeks where I may not have the time to finish a project but not for a project to somewhat fail. I say somewhat because I was working on a dress and the bodice came out beautifully.  Not perfect. but beautiful. I was proud of my work.  As I was finishing the skirt to attach it to the top I noticed that the hem was off but I figured no big deal I could fix it.  but in the process of fixing it. I made it worst..... ugh!  So what was a seamstress to do with my weekly time clock ticking and running out of time......? I tried to start another outfit.

I had the idea and fabric for next weeks post already laid out in my mind.  So I thought I could switch things around and finish next week's post for this week.  I even had the pattern pieces cut and ready to go.  So I decided to go for it. In under 2 hours I had the overall project assembled. The challenge came in finding the time to do the finishing.  Which is what takes the longest time.  Hems, zippers, waistbands. These are the parts of your project that requires time and technique.  You can't rush through finishing. At least I can't because history has taught me that i'll mess it up. So I decided to walk away and give it some real thought.  In the end I opted to wear one of my back up garments.  These were some things that I made before launching the blog in the event that I wasn't in a position to sew something by Sunday. Thank God for preparation.

This week's post is what I call my "Mad for Purple Plaid" pencil skirt.  I love this skirt for many reasons.

1) The first reason is that it is made from vintage plaid fabric that I inherited from my sister-in-laws grandmother's sewing collection.  This was such a great gift.  I received a vintage sewing machine with all of the parts, vintage steel hand sewing needles, vintage patterns, and vintage fabric, some sewing books.  I love! love! love! vintage sewing. That this skirt was made from a piece of history is amazing to me.

2) I love this skirt because it was my first time sewing with plaid.  If you are a sewist and have ever sewn with plaid fabric then you know what i'm talking about.  If your a reader who aspires to sew..... let me enlighten you.  Some fabrics such as plaid requires that you pay special attention to all the lines in the fabric pattern.  This small attention to detail pays off big if you do it right.  So this was my first attempt at plaid and I missed the mark in certain places but overall I didn't do bad. From the pictures below you can see the not so bad plaid alignment.  The side seams line up pretty ok and the trickiest part was getting the zipper in and making sure the plaid lined up. This was the not so perfect but pretty darn close.


3) I love this simple purple plaid loveliness because it has been a long time since I lined a pencil skirt and I am very pleased with the lining.  I used a cream colored anti-static lining from Jo-anns it usually runs 7.99/yd but of course I always have my coupons at hand.  but I like the weight and hand of this fabric.  Its not as nice as bemberg but very similar with a cheaper price tag.  They also usually have a decent selection of colors to choose from.


I just love the way the lining looks set into the waistband.  All the seams are tucked nice and neat underneath the lining.

From the picture above the zipper is sitting nice and secure in between the lining fabric and the plaid. It had been so long since I had sewn a lining that I forgot how to insert a zipper to the lining using my sewing machine.  With a little patience I finally remembered and with just a few practices I was able to get it in perfectly!!!

Now comes the second trickiest part of this project.  I had a hard time styling this lovely purple piece of American sewing history.  The colors in the plaid are so bold that I wasn't quite sure if I should have pulled a color from the plaid for my top selection or go with a more neutral color like cream. In the end I decided to go with my wardrobe workhorse this season. My button down denim shirt.  I belted it with a black leather belt and wore my black pumps and a pearl necklace.  In the end I didn't mind the outfit but I think the next time I wear it i'll pair it with a nice cream sweater or cardigan and tie in the colors of the skirt with my jewelry.


I even had a hard time figuring out what color tights to wear.  I prefer none altogether but the dropping temperatures outside makes it harder for that to happen. So I opted to wear nude colored pantyhose.  Not tights but pantyhose.  Its been a minute since i've worn those. Like a couple of decades. Even my 10 year old daughter asked me wear I got those tights from. She had never heard of pantyhose before today.

So there you have it. I had a challenging week that even challenged my 52 week wardrobe challenge but I thank God that I overcame all of it.

In closing, if your wondering why i'm not in this week's post its because my daughter who is my usual photographer wasn't feeling so well. So I had to opt for using my mannequin instead.  Just one more challenge that I blew my way through!

Have a blessed week!

Tuesday, December 1, 2015

Teach Me Tuesday: How to Understitch a Lining


Happy Tuesday Readers!

This week's post was inspired by one of my students who is currently using her lessons to sew herself a dress for her 15th birthday party.  One of the things that I love about teaching is that as an instructor I am constantly learning in the process of teaching. Today as we were working on attaching the lining to her bodice we began to have a discussion about under stitching the lining to the neckline.  And the lightbulb for this post went off.  

Understitching is simply stitching a line close to the edge of a facing to keep it from rolling toward the outside. It comes in especially handy when sewing around a neckline. It keeps the facing, or lining, firmly on the inside of your garment without any stitches showing on the outside.

"It is the small details when you are finishing your garment like understitching that are necessary for quality construction and a professional finish."

How To Understitch

For this tutorial I used 2 different cotton fabric swatches in order to demonstrate the technique but as I mentioned in the definition above, understitching is best utilized around the neckline of a top, bodice or jacket.  There are other places where it can be useful but these are the most common.


1) You underline right after you attach the lining or facing to your garment.  For this tutorial I utilized a white cotton with black polk a dots for the lining and a black fabric with white dots and cherries to represent the fashion fabric.  So as you can see I sewed my two fabric swatches together.


2) Take your project to the ironing board and pull your lining away from the fashion fabric so that the wrong side is faced down on your ironing board.  Press out your seam with the seam allowance pressed over to lay to the lining side of your fabric.  

  ***Note: It is really important that you give your garment a good press prior to understitching.  If you don't you may have some slipping and uneven stitches.  A nice flat seamline will make it easier for your machine foot to glide along the seamline.


3) Once your done pressing. Take it back to your machine and line up your machine needle about 1/8 inch from your seamline.  I used a straight stitch foot and just lined up the seamline with the right side of the pressor foot.  

4) After you under stitch you take your garment back to the ironing board and fold the outside of your garment over the lining with the wrong sides facing each other.  Press your new seam.
Here's what it should look like once your done.  The stitches are close to the seamline but are only visible from the inside of the garment.


And thats it!  Be Bless! As always Questions, Comments and Prayers are always welcome!


Sunday, November 29, 2015

Sunday's Best: Week 6

"but those who hope in the Lord will renew their strength......."
                                                                                     Isaiah 40:31


Hola Readers!

I am enjoying a much needed rest in the Wisconsin Dells this Thanksgiving holiday weekend.

I hope that you all are enjoying your Turkey Day weekend festivities.   The temptation to not post this week was heavy on me.  Especially since my kids were off of school beginning on Wednesday and we were leaving for our mini-vacation weekend Friday afternoon. But i'm so glad that my desire to write outweighed my temptation to bail. 

Its very pretty and peaceful in the Wisconsin Dells this time of year.  Its also cold!  Walking to the resort indoor waterpark pool in a swimsuit, cover-up and flip flops has been a chilly trip.  But the heated salt water wave pool, family time and good food has been giving me a warming feeling inside.


Besides cold weather isn't all that bad if your properly dressed so I decided to take myself back to my crochet roots and work up a sweater for this week's challenge.  I started Virtuous By Design crocheting hats and scarves back in 2013.  It wasn't until last spring when I applied for a business loan to purchase sewing equipment that I began to focus growing the sewing side of my business.  So I thought the short week and cold weather was a great excuse to crochet.


This weeks garment is what I call my sport poncho.  Its like a hybrid between a sweater and a poncho.  It's crop length is not quite long enough to call a poncho and its extra wide, 3/4 length sleeves doesn't fully qualify it to be called a sweater in my opinion.  I like it because its a nice layering piece that keeps you warm but the extra wide sleeves gives your arms ease of movement.  I find that it looks best with a long sleeve henley t-shirt or a crisp button down shirt underneath as I have pictured looks good too.


I used basic crochet stitches to come up with a simple stitch pattern that would make a fabric that was both warm and sturdy but also fluid enough that the big dramatic sleeves would drape nicely.  In the end I was quite happy with the result. Here's a nice shot of the back.  You can see the sleeve detail a bit better.  


I originally wanted to wear this sweater on the return trip but forgot to pack it.  What I didn't forget to do was keep warm and have plenty of fun with my family!


In closing,  this weekend's getaway was a much needed act of rejuvenation and  i'm rebooted and ready sew through the coming Christmas Holiday Season!  Be Blessed!


Wednesday, November 25, 2015

6 Holiday Sewing Crafts for Kids (Round-Up)


Hello Readers!

The Thanksgiving Holiday is upon us and this week I wanted to share simple hand sewing or no sew holiday crafts that children and/or families could do together.  Being a single parent I know that children can sometimes get bored when they are off from school for the holiday break.  And between spending for the Thanksgiving feast and the upcoming Christmas season budgets can be tight.

I did a search of various craft and sewing blog sites and rounded up a series of inexpensive activities that even your 3 year old could do with a little help of course! These are mostly winter or Christmas themed activities but can easily be adapted to any holiday you are celebrating.

I love this leaf garland made with felt and yarn from the blog "A Beautiful Mess"  I know that fall is pretty much over but you could easily Change out the leaves for snow flakes, angels, or christmas trees even hearts for Valentine's Day would be cute.

1


http://abeautifulmess.typepad.com/my_weblog/2011/09/fall-leaves-garland-diy-project-.html


The sewing teacher in me absolutely loves these sewing cards.  There is no tutorial with this site but if you scroll down below you'll see a very similar project posted in Parents Magazine with instructions.  This project is an easy way to introduce very young children to sewing while working on developing their fine motor skills.  These could easily be turned into Christmas tree ornaments or if you use a larger sheet of paper it could be a holiday card or thank you card.  This is the one I think I am going to choose to do with my children.


https://www.flickr.com/photos/goldtop/330122202/in/photostream/


What holiday sewing craft round up would be complete without the famous no sew fleece project.  No sew has taken American crafting by storm.  From scarves, to blankets and now we have the heart pillow.  Seriously though....  I think this is a great and inexpensive way to spend time to together as a family.  You could even have a conversation with your kids about being thankful or about love and how we express love or receive love as it relates other people in our lives.


http://krokotak.com/2015/01/heart-pillow-no-sew/


This is similar to the snowflake sewing cards.  This post actually has instructions on how to do the craft.  I love the idea of taking simple shapes and turning them into handmade ornaments.  You could even turn it into a learning lesson for your pre-schooler. I also think that as simple as it is its still something that I think older children and adults can enjoy as well.


http://www.parents.com/holiday/christmas/easy-ornament-crafts/?page=2#page=2


I have had this project on my Pinterest board for quite sometime and stumbled upon it while I was preparing this post.  This is another no sew option and another tree ornament using yarn and cardboard.  I like the idea of making the star bigger and turning it into a window or door ornament.


http://livelaughrowe.com/yarn-wrapped-star-ornament-diy-tutorial/


Last but not least.  I couldn't pass up the sock snowman.  Isn't she cute!  Easy project using left over socks.  Some simple hand sewing is involved but the rest is hot glue.  I've seen the "Olof" version of this on pinterest and I was sooooo tempted to please the "Frozen" fans out there but in the end her pink hat and rosy cheeks stole my heart!!


http://creativemeinspiredyou.com/snow-cute-snow-men/

And that's it! I hope that you all have a Happy Thanksgiving and that these crafts help to get you in the mood for the upcoming Christmas season!!!! Be blessed!


Sunday, November 22, 2015

Sunday's Best: Week 5

 "......except Caleb son of Jephunneh. He will see it, and I will give him and his descendants the land he set his feet on, because he followed the Lord wholeheartedly.” Deuteronomy 1:36


I am completely overjoyed over this week's garment.  Using the same purple dress pattern I made a crop top and pencil skirt set.  It is a personal testimony of what perseverance and self-discipline will yield.  I mentioned last week that I have been sewing with knit fabrics at the studio and I can't begin to explain to you the things that I conquered. 

Sewing with knit fabric isn't hard but finishing your garments can be tricky especially if you want your garments to look professionally made.  I am especially proud of the top that I made to go with this skirt. I altered the bodice pattern in order to add a yoke using some left over stretch vegan leather fabric. I also opted to not finish the neckline with a raised neckband collar in favor of finishing the neckline in the same black fabric.


This is the first time that I allowed myself to experiment with altering the style of an existing pattern and although I have used a band or bias tape to finish a neckline before I used a different technique that allowed me to use my serger to finish the edges.  Even the inside of the neck area looks clean and professionally finished.


For a long time I struggled to believe that I could excel at sewing. That the passion and love for the craft didn't match my ability.  However, what I am learning is that while some gifts that we have come naturally, others have to be developed.  This requires a level patience, self-discipline and a willingness to persevere.  This week's photo shoot is an example of perseverance.  

Every week I wonder where am I going to take my photo's for this post and between making the garment, other business and family responsibilities it always ends up being where I feel the most comfortable.  In my home.  However, the lighting  inside of our house sucks and I had no other choice than to go outside. As you can see from my face in this picture I was cold.  I don't know how models do it.

Truly though, I am a city girl with country girl tendencies.  I love nature and feel most comfortable when I am surrounded by it.


I am overjoyed not only because of my dressmaking triumphs but as I am writing this post I am being reminded of the many other areas of my life where I exercised self-discipline and persevered.  That's one of the things that I am coming to enjoy about Sunday's Best is that it has been giving me the opportunity to reflect on my week and share it with others.


In closing, I want to thank my lovely daughter Asabea for graciously agreeing to be my photographer again this week.  I also want wish everyone a Happy Thanksgiving Holiday! I pray that you all eat a lot and have loving people to share it with!  Be Blessed! xoxo


Tuesday, November 17, 2015

Teach Me Tuesday: How to add a yoke to a bodice


Hello Fellow Sewists! I am so excited for today's post.  I have been wanting to flex my dress designing muscle lately.  I usually have a dress design in mind and I look for a pattern that most resembles what I envision.  But buying patterns all the time and having to constantly adjust the fit on them is time consuming.  I am also finding that it isn't always necessary.  Especially if you have taken the time to work out some pattern slopers.

Which leads me to today's post.  I am looking to do a variation of the purple dress I wore for this past "Sunday's Best" post.  However,  I want to add a front yoke in a contrasting fabric to the bodice.  After doing a little research and using some common sense I came up with a pretty straight forward way to adjust my pattern.

So here we go....

Supplies:

Butcher Paper
Measuring Tape
L-Ruler or yard stick
A bodice pattern that has already been adjusted to fit your body
Fashion fabric of choice and a contrasting fabric ( I used stretch knit for both)  You can also use this technique on a woven fabric.


1) Measure the front length from the highest point of your shoulder which is right at the based of your neck straight down the side front of your body to right above your bust line.  Its usually right where the front crease of your armpit is.  For me this is 8"


2) To preserve your existing pattern trace your bodice on to a clean piece of paper.


3) Take your measurement to your pattern piece. line up your measuring tape or ruler with the  shoulder point that is closest to your neckline. Now measure straight down
and mark your top bust point.  For me this was 8".


4) Using your high bust point as your starting point, take a straight edge and draw a horizontal line across the top of the high bust area of your bodice.  It should intersect with your 8" marking point.


5) Cut your pattern including across the line you drew to separate your lower and upper bodice piece.


Seam Allowances


6) Now here is the tricky part. in order to keep the measurements of your bodice and armhole you have to add a seam allowance to the bottom of the yoke area and the top of the lower bodice piece that you just created.

7) To do this mark your desired seam allowance. Because I am working with knit fabric and plan on using my serger to sew this dress I only added a 3/8 inch seam allowance.  You can use 5/8 of an inch if you want.

8) Place your lower bodice piece on yet another clean piece of paper ( you can do the draft of this on newsprint first and then if you want to preserve this pattern retrace it to nicer paper).  Mark up from the upper edge corners 3/8 inch.  Connect your points with a straight line using your measuring stick and carefully connect your new line with existing pattern.


9) Trace the rest of the pattern with your new seam allowance added.


10) Do the same to the bottom of your yoke piece.

11) Cut your new pattern pieces.

12) Cut your fabric using the lower bodice pattern for your main fashion fabric and cut the yoke with the contrasting fabric.  Sew the two pieces together. Your finished bodice should look like this.


Voila! That's it.  A brand new bodice!

Enjoy! Be Blessed and as always comments, questions and prayers are welcome!